Monday, May 17, 2010
Saturday, March 13, 2010
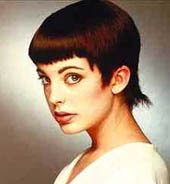
New Dry Hair Cutting Trends

The art of dry cutting hair is something that is not taught in beauty school. Most stylist learn their techniques through other stylist. Every hair show has a plethora of dry cutting techniques in every corner so if you are a stylist I urge you to take advantage of the learning opportunity provided at hair shows.
There are several advantages of dry hair cutting. You can see exactly what the hair is going to look like when it is styled and done. No worries about shrinking, excessive weight or the client being unhappy with the finished result. A few hairs taken out of the right spot can eliminate weighty areas and solve many styling problems. After all the most important thing is that your client can recreate the look at home with ease.
Alot of haircuts are simply impossible with wet cutting as well. The slicing techniques shown here using Hikari dry cutting shears would not turn out as well if done wet. Too much hair could be taken out very easily leaving holes.
Dry cutting is not something the novice stylist is able to master easily. Training is needed to perfect this technique. If you stylist is uncomfortable with the idea of dry cutting they really shouldn't attempt it until they have a little more education in this area.
There are some disadvantages of dry cutting. You need to take smaller sections than you do with wet cutting as you guide is more difficult to see. It also is rough on your shears and they need to be extremely sharp for best results. There are several brands of shears now that are made specially for dry cutting. Most of them are Japanese brands made of top notch materials to maintain their razor sharp edges for longer.
Dry cutting is great for curly hair as well! You can see exactly how the curl pattern lays when dry because you cant always cut curly hair 100% symmetrical. You also have no worries about where the length is going to end up dry.
Dry cutting can also take a little extra time and effort. The hair should be washed and dried then flat ironed for best results prior to cutting. Many stylist will perform the basic rough cut while the hair is wet and then cut the interior dry. Some prefer to do the entire cut dry. It really just depends on your comfort level.
In the end, the advantages of dry cutting far outweigh the disadvantages. Your clients will be amazed at the results and at how easy their hair is to style every day.
Friday, March 12, 2010
Gaining Control Over Your Cowlicks and Swirls

GOT A COWLICK?
Has anyone ever told you to comb it another direction repeatedly and it will go away?
I bet you've tried that for years and nothing has changed. The cause of a cowlick or swirl is simply the direction the hair follicles are pointed. All the brushing in the world isn't going to "train" your hair follicles to do something else. The only thing really in training is you learning to cope with it!
Modern medicine does provide a permanent solution in the means of plastic surgery. Hair follicles can be surgically altered to point another direction. Some people have even resorted to electrolysis and waxing to damage the follicle growth of the hairs in the cowlick possibly resulting is softened hair growth or no hair growth at all.
Another great temporary option is a chemical restructuring of the hair. A good stylist should be able to apply a perm or relaxer directly at the root area of the problem. This will not completely remove the cowlick, but it can temporarily soften the growth pattern leaving it more manageable. This process will have to be repeated every few months to maintain so it is really best if the chemicals are only applied on new growth and not overlapped which could lead to breakage.
Of course most people do not have a problem with their swirls that warrant such painful and brutal measures. Most cowlicks can be tamed with product, styling techniques and the proper haircut.
The first step in taking control of your locks is admitting you have a problem. Just because you see a picture of a haircut you like, doesn't mean your hair will actually do the same thing as in the photo. Admit to your "problem area" and go with the flow.

Look for less structured styles with more of a free flow feel. This works especially well for people with wave or curl in their hair. Tousled messy looks are making a huge comeback. Sea salt and texturizing sprays are a great lightweight alternative to gel to enhance your natural locks.

If your hair has cowlicks in the front along your hair line avoid wispy bangs. You need weight to pull down counteracting the growth pattern. So styles with no bangs are ideal for people with hairline swirls. If your bent on having a bang, go for a heavy bang that will have enough weight to lay correctly. A side bang will camouflage the problem area easier than a full straight bang. If you do
 wear a full bang straight down it needs to be pretty weighty to mantain its shape.
Your blow dryer and flat iron will be your best friend. Make sure you dry your hair from soaking wet for best results. If you let the hair dry even a little it is forming the pattern of the follicle direction leaving your hair more difficult to shape when dry. Use a round or vent brush with a metal barrel which will heat up and help to set the new pattern in place while drying. After your hair is completely dry, Heat up your bang with the dryer and then use your cool button to rapidly cool the hair and set it in place.

For men's cowlicks, you have 2 choices....short and tight or longer and messy. The in between lengths just end up leaving you looking like a 5 yr old with a $5 haircut in a mans body. Try pomades and waxes for workable messy with a little hold.
 If you have cowlicks at the nape line, your best bet is to keep your hair long enough to weigh down your cowlick. Or your can take advantage of the cowlick and wear a messy flippy look along the bottom of a bob style haircut.
 If you choose to wear it short, it must be kept short enough to avoid sticking out and looking messy. I dont mean messy in a good way either! Messy like the photo on the left looking like you have a rooster tail sticking out the back of your head! That haircut would look 200% better if someone just wacked that thing off the back!
If you can train yourself on how to work with your natural growth pattern, your hair will end up looking the best it can possibly look. You will probably even have people ask you "How do you do that? I want my hair like yours!"
Tuesday, March 9, 2010
Should I Change My Shampoo Every Few Months?

You may find yourself falling in love with a certain shampoo and two months later it just isn't doing what it used to do for you anymore. So you constantly battle between shampoos trying to find one that works for your hair.
What you may not realize is the problem could simply be a buildup from your shampoo, conditioner or styling products that is causing your hair to flop! You should only need to change your shampoo and conditioner if the integrity or texture of your hair changes. A good example would be if you go and get highlights and your hair is suddenly dryer and needs more moisture than it did before the highlights. Or if your hair changes texture as you age or you get a chemical service to change the texture such as a perm etc.
Alot of products tout the guarantee that they leave no residue or buildup. All products eventually leave a buildup on your hair despite what the manufacturers say about it. Ive learned this through my own personal trials with my hair. Ive found the cheaper the product, the faster it builds up. The ingredients in cheaper shampoos like Pantene or Suave are not as high grade as say a top shelf product like Pureology ,Aveda or Alterna. This is simply due to the fact the makers have to keep their costs at a certain level in making the shampoo to sell it for a certain price to their targeted market. The thin film left by all your hair care products can slowly build and build until you end up with a real problem. A higher end product may not build up to the degree a cheaper one will, but eventually the performance of the product will diminish due to minute deposits that do not rinse completely out. Even hairspray and gel build up can cause your shampoo and conditioner to not perform as well as they could.
But you say when I change my shampoo the problem goes away! It must not be build up. Well a different hair care regime may remove whatever was building up in your last shampoo/ conditioner, but may leave a new problem behind after several uses.
So before you throw in the towel on the shampoo that once did wonders for your hair, try removing the build up and give it a second chance!

You can buy a clarifying or detoxifying shampoo to use every once in a while and keep in the shower for a change and to get your hair squeaky clean again. Alternate this with your regular shampoo as needed. Once every week or two should be enough to keep the build up at bay.
Another great easy option is using a bit of apple cider vinegar mixed with distilled water. Use about 1/4 cup of vinegar per gallon of water for best results. You can keep this mixture in your cabinet to use as a quick rinse in the future and it costs very little to make. After you shampoo your hair run the mixture through your hair saturating it thoroughly. Make sure you rinse your hair very well after so you don't get mistaken for a salad! After you've rinsed well go ahead and use your conditioner. This can be done every few weeks for best results.
You can also use a bit of lemon juice mixes with water at the same ratio if the smell of the vinegar is just too much for you to handle. However DO NOT store the lemon juice mixture for use later as it can go rancid fairly easily. Only mix what you need for one use.
All of these techniques should remove shampoo, conditioner and styling product residue safely from your hair without damage. Your old fave should be working again!
Monday, March 1, 2010
Consider Cosmetic Tattoos as an Alternative to the Knife
Tattooing has been used for centuries for body art in every culture in the world. Scientist have found mummified remains with tattoos dating back to 9500 BC. While this practice is far from a new concept, modern techniques have widened the usage of the application far beyond body modification. It has become a viable alternative to many plastic surgery procedures.

Permanent eyeliner and permanent eyebrow arching are becoming more and more refined and less "artificial" looking.This can be a great benefit to those who suffer from a lack of eyebrow hair or even eyelashes. Subtle shading of the lash or brow line can make the appearance of thin, sparse hair look fuller brightening overall youthful appearances.Even lip color can be enhanced and uneven formation of the lip line can be camouflaged leaving the lips looking
healthier and more even in shape.

More importantly tattooing is now used to camouflage the appearance of scars and surgery wounds all over the body. Pigments are carefully matched to the skin tone and injected below the skin carefully into the scar leaving droplets of missing pigment to fill in the white lines left from injuries or pigmentation losses. Plastic surgery can fix things under the skin, but generally leaves unsightly scars which you have to hide with makeup. This application can even be used in cases of skin grafting and burns as long as the scars t
 hat are left are white in color. Cleft palate scars, skin cancer scars, acne scars and more can benefit from this procedure.
Evening out skin pigment on the facial area is a wonderful idea as well! Years of sun damage can lead to pigmentation problems. Lasers can be used to remove dark spots but placed where pigmentation has been lost can only be fixed by reintroduction of pigment into the skin.
The best use of the tattooing process is probably for breast cancer victims who have lost their aureoles and nipples. Implants and skin grafts can replace the fullness of the breast, and reconstruct the shape of the nipple. The coloring and shading of the area though is something is left to a skilled medical tattoo artist.
It is good to know though most insurance companies will cover cosmetic tattooing that is used to cover scarring and reconstruction!
Tattoos for cosmetic purposes do fade over time and may need touched up now and then. The time between touch up largely depends on the skin being tattooed and how
well it holds the ink. Touch ups are usually less time consuming and less painful than the initial procedure.
What is it like to get a tattoo? Well the best I can explain it from personal experience is it feels like someone rubbing a hot match over your skin repeatedly. It
isn't exactly pleasant, but its a more of a discomfort than a pain. Tattoos performed on scars is said to be slightly more painful than on unscarred skin. Medical
tattoo artist operate in highly sterile environments. Needles come in single use prepackaged sterilized packs similar to any other sharps used in medical facilities.

Choosing your tattoo professional should involve more than a phone call! Go in and see the facilities. Ask to see photos of before and after pics. Get an in depth consult on exactly what they would recommend. Make trips to several artist before you decide on one! While you may think you LOVE the first one you visit, you need to compare the artist capabilities to make sure you are getting the best possible results. Tattooing is an art for and like any other art each person
sees things from their own viewpoint so make sure your artist can fulfill your visions.
Before you get a tattoo procedure done, check with your doctor! Medications like blood thinners and certain pain medications and any type of bleeding disorders and anemia can cause excessive blood loss during tattooing. Avoid any alcohol a few days before the procedure as well because alcohol thins your blood as well. You may think, ohhhh what does it matter if I bleed a little more. Well for starters, your bleeding back out the ink you just went through all the work to
inject! You also do not want scabbing of the area to occur. This can lead to scarring and leave the skin prone to infection.
Aftercare is generally pretty simple. Leave the dressing on for a few hours if applied. Make sure to gently wash away any oozing plasma left over on the area because it causes a scab to form which you do NOT want. Most times A&D ointment is recommended for aftercare. Neosporin is not recommended but they should tell you what you need to use over the area. Redness and irritation should be minimal and be soothed by a cold compress.It should be totally healed in a few days. Again avoid anything that will thin the blood until it is healed. Don't use anything abrasive on the would like a washrag. Clean hands and some antibacterial soap is just fine. Pat dry don't rub. It will feel like a pretty good sunburn for about 48 hours no biggie.
So now that you know the ins and outs of cosmetic tattooing, consider it as an option before deciding to go under the knife!
The dangers are significantly less and alot of times the results are far better.
Thursday, February 25, 2010
THE BIG TEASE! How To Tease Your Hair.

So you want that OOMPH but every time you try to tease your hair for volume, it ends up STILL falling flat and looking like a hot mess.
Teasing takes a little practice but once you get the hang of it, you will find it to be a valuable skill in your hair styling.
I find it best to start with my hair already completely dry , straightened or curled. Do not use any type of firm hold styling product before beginning the teasing process because you need to be able to easily comb through the hair and smooth it over the teased sections without any added pulling to get through the hairspray because it will just pull out the teasing in the meantime.
Now decide where you want the volume to be .Your want your teasing to start about an inch in front of where you want the volume and continue to about 3 " BELOW where you want the volume. This will give you a good support base to keep your style in all day.
Begin taking small horizontal sections about 3 inches wide and a inch thick from the top. It is much easier to work from the top down.

Tease beginning about 1/2 inch down on the shaft.Once you tease the half inch nearest to the scalp you can work down the shaft a few inches and tease. This gives you a good locking base for your section to make sure it stays as close to your scalp as possible through the day.
Now once you have your first section teased go ahead and move onto the next section. Once you have the 2 sections teased you need to take both sections and lock them together by teasing the divide between them. This is a really important step most people do not know to do! If the sections are not locked you will not have a good base and your hair will fall in between the sections leaving you looking lumpy and ratty in a few hours. Every section needs to be secured to the others to make one solid piece of teasing. Keep flipping the sections you tease up towards your eyebrows and pick up the section below and tease it into the rest.
After you have completed your teasing all around your head take a FIRM hold aerosol spray and give it a good spray all around the teased area. Spritz hairsprays are not good for this sort of styling because they take too long too dry and make your hair wet in the process leaving your hair hard to smooth over. Make sure the spray is 100% dry before moving the hair.

Now you are ready to begin the smoothing and placing process. I like to use a natural boar bristle brush to do my smoothing working from the top down the hair shaft .If you use a vent brush it is easy to pull out your teasing while smoothing so be careful! Use your fingertips to gently hold the teased "nest" in place while you style the bottom of the hair.
Once you have it where you want it give your style a good spray with a medium hold spray. If you have a good base to your teased section a medium hold spray is all you should need.
Remember practice makes perfect hair!
Sunday, February 14, 2010
Baby Hats? Learning To Know When To Stop a Fad


I was walking in the mall this week with my teenage daughter and we kept noticing people who looked fresh out of a cartoon with fads and clown colored clothes all over the place!
I mean I'm all for a good fad now and then but WOW when do you know where to stop? There are teeny tiny hats made for leprechauns in every store.
From an editorial standpoint I can see the attraction on camera but when you see a 14 yr old chubby emo wannabe girl with pink hair and a baby hat you just gotta sit back and laugh.
I guess there is a time and place for everything is the key to wearing a fad successfully.
Take a look around and if you see your desired fad purchase worn in a way or place that is laughable, it is probably for the best that you steer clear of it.
If your not at a club or event where everyone is wearing tiny hats, and no one is taking photos of you, then you just look like you have a really fat head and cant get a hat to fit you.
Make sure the fad you choose fits the rest of your "persona" too. Only wearing one fad a time is recommended, but at least choose and ensemble that is complimentary to the fad you are wearing.

hehe check out the daisy dukes and the sweet converse shoes !
Erryns Health And Beauty On Facebook
SO I guess its time to get out of the stone age and ditch Myspace for good. Its like an abandoned playground anymore even with all they are trying to do to revive it .

We now have a Facebook page which we would LOVE to see everyone join in the fun! We are having a contest this month to see who has the worst salon horror stories( you know how I love a good salon horror story!)
Become a fan and join in! Even if you dont have a horror story yourself, you have the chance to vote for your fave story and help us decide on a winner.
Check out the discussion board for all the details!
I will be adding coupons, contests, tips and tricks and a great topics for discussion for all! I already spend WAYYYY to much time on FB so this will only add to my time management problems I am sure but HEY its my time to spend however I choose right!
Hope to see you there !
Long Time No Blog!
Busy Busy Busy!
Besides keeping our business up and running we have had some HUGE changes in our personal life. Blogging just became an afterthought.
My grandpa became ill and had ot be moved into an assited living facility and we had the wonderful task of auctioning everything off and helping both grandparents set up new living arrangments. I am gratful they are still around to do these things for...but it does consume quite a bit of time.
On top of all of that we bought a 150 yr old house in dire need of renovation and have spent countless hours remodeling. There has been days on end where I look at nothing but a wall all day sanding and painting, stripping wallpaper and patching holes. Its still not done but at least the worst is out of the way!
OH and we moved our ENTIRE inventory to a new location. Our last location was busting at the seams and we were renting storage facilities for the overflow! That ended up being a 2 month process getting it all set back up. Moving truckloads of bottles liquids is not much fun I tell ya!
So blogging is something that has been on the back burner for some time but IM BACK!
Take care all and hope all is well :>
Subscribe to:
Posts (Atom)


